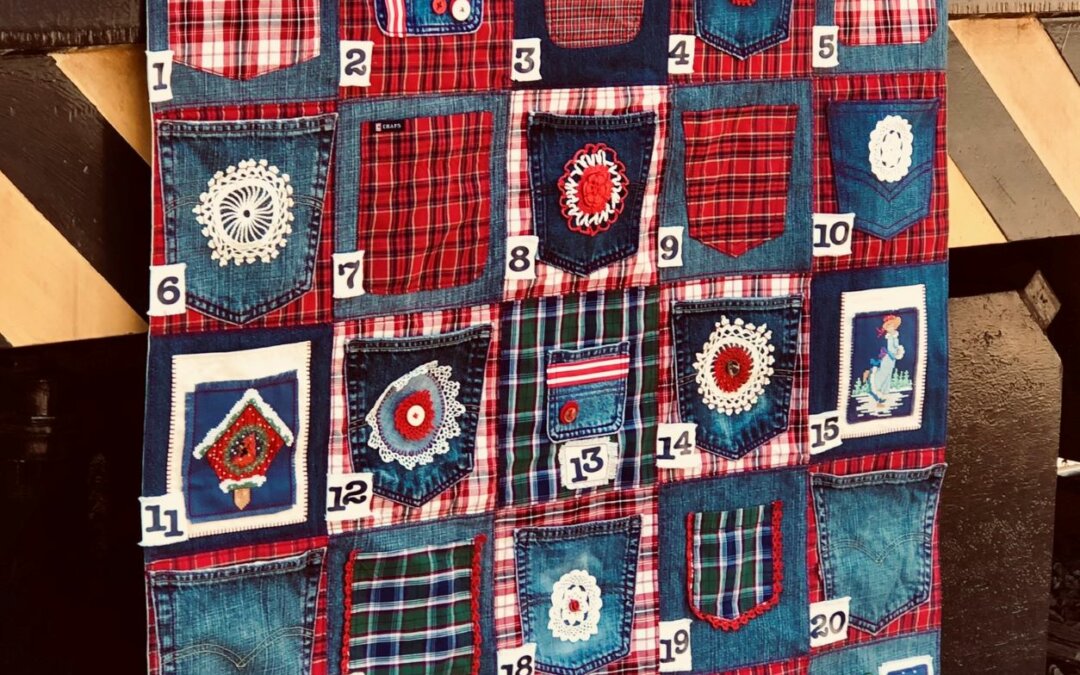
Transforming Discarded Clothing into Something Useful
I am always looking for ways to repurpose my husband’s old jeans and dress shirts. With a little imagination and creativity, this advent calendar turned into just the grungy look I had envisioned. I love how the larger pockets allow for more than just a Hershey kiss in the space (no offense to Hershey kisses)! Read on to see how I used other textile scraps to bring this advent calendar to life.

Repurposing Doilies, Hankies, & Cross Stitch Orphans
Collecting vintage textiles created from ladies of leisure of times past is a passion of mine. They are so beautiful. Someone took so much care to make them. Then they just end up in a thrift store. It breaks my heart. This was the perfect project for putting these pieces to use in an unexpected, and likely unintended way.
Doilies Deconstructed
Below, you see I took a larger doily and snipped a couple of smaller circles off of it. Because I knew it would not be harshly used, I wasn’t worried about the pieces cut off fraying over time. I hand tacked each one down with Perle cotton thread. I did this before attaching the pocket to the background fabric.


")
")

Handkerchief Edging
I looooove using crochet edging of handkerchiefs in sewing projects. Often, they are overlooked in antique stores because the handkerchiefs themselves are often plain. However, I appreciate this edging and envisioned using it in seams to help the pockets pop out in this project. I cut the edging leaving a quarter inch allowance, and sew it right into the seam.


Cross Stitch Leftovers
Years ago, to occupy myself during the holidays, I got cross stitch book from the library and stitched these cute little scenes. Then, I stored them away and did nothing with them (for shame). I decided the colors would go with this project just perfectly, and add interest. I created the pockets from linen I had on hand in a similar way one would make a pillow form, with a turnhole. I frayed the edges of the cross stitch piece, and straight stitched it down on the pocket. I then blanket stitched the pocket to the background fabric.

")
")

Constructing the Pockets
I didn’t have enough pockets for an advent calendar. So I took the existing jean and dress shirt pockets and used them as templates for shape and sizing. I traced the pockets onto extra fabric from the jeans and shirts. In the example below, you can see I even used red denim topstitching thread to mimic the stitching found on regular jeans pockets. (I used red topstitching thread to affix all the pockets for the holiday vibe.)

")

Putting It All Together
Using a design wall, I arranged denim and dress shirt squares in a way I liked. Then, I planned pockets and pocket embellishments. I didn’t want the pockets to look to plain, but I also struggled, not wanting them to be too busy either.
*Note: ALL of the background fabrics are stabilized with a lightweight interfacing. Yes, I did try to get away without using stabilizer, but the dress shirt background puckered and shrunk up when sewing the denim pockets on. The denim background curled at the edges. Although denim is a durable fabric to sew with, it can be stretchy. I recommend always stabilizing denim in sewing projects.


")

")
I could have used the standard gold jeans thread, but I had some red on hand and I liked the idea of using red to continue the red accents everywhere on this piece.

The Sleeve
After sewing all of the rows together, I cut a piece of canvas fabric the exact length of the calendar, 40 inches. I folded the raw edge under and stitched it down. This then made the sleeve just short enough not to get caught up in the side seam once I sewed it all up. I cut the width of the sleeve according to the size of the dowel rod plus half each seam allowance on each side. I wanted the sleeve to be snug.

No Batting!
I saw no reason to add batting to this. I used a canvas fabric for the backing, sewed all around with right sides together and a ~3/8″ seam allowance. ensuring the sleeve was sewn into the top edge. I left a turn hole in the bottom, snipped the corners, and turned it right side out. I topsitched 1/8″ from the edge all around, which closed up the turn hole. I also topstitched using the red thread and a denim needle, straight lines 1/4″ from each seam. It turned out sturdy and fantastic!

Two Things I Would Do Differently
1. Make it smaller. The size of this upcycled calendar is determined by the size of the pockets. I’d make it again with children’s jeans, thus smaller pockets and a smaller overall calendar. I don’t really have a place to hang this in my house.
2. I would construct the numbers differently. I like the way I did a couple of the numbers by stitching them down like a patch on the square. I didn’t have space to do this with most of the squares. With smaller pockets, I could make room for patching the numbers on.

That’s a Wrap
I had so much fun just letting my imagination and creativity take over with bits and pieces of what I had on hand. Let me know what you think in the comments. I’d love to know if you’ve ever sewn an advent calendar and how it turned out!


Keep up the good work.
Thank you😊