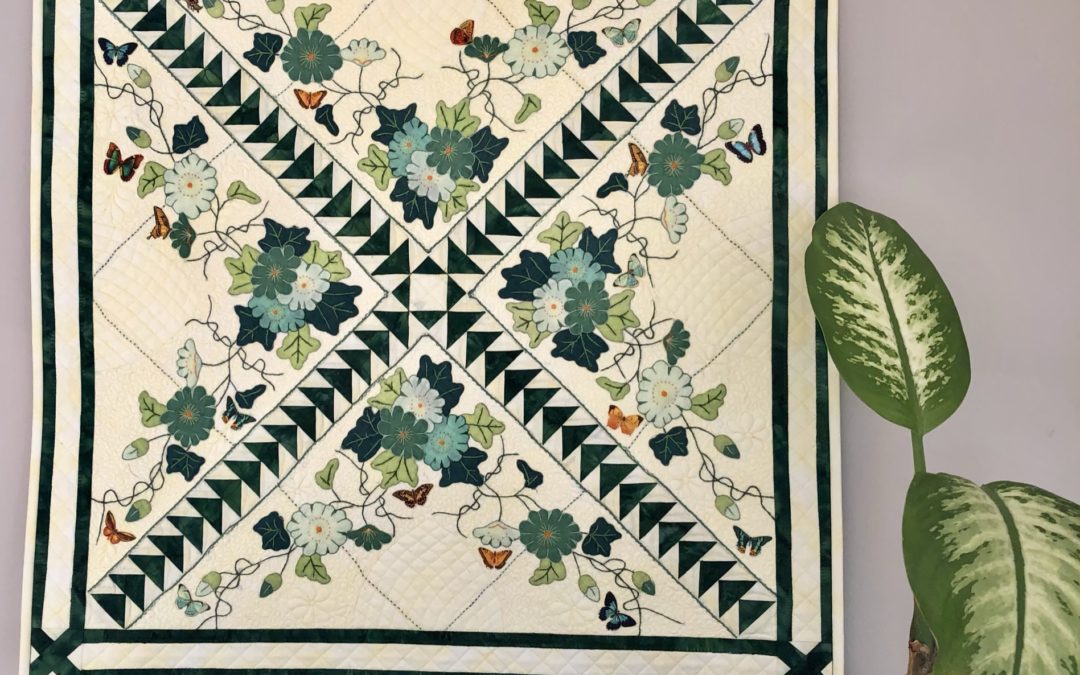

My mother-in-law knows me well! Not everyone can say this, I realize. She found this gorgeous vintage tablecloth in a thrift store and snagged it for me!! She gave it to me for Christmas. My favorite present that year, of course. I instantly put all other projects on hold and dove into this one. I was inspired to turn this into a wall hanging.
Was it difficult to cut into this exquisitely appliqued work of art in itself? Yes. However, I keep my eye on the end result. I know I’d never use it as a tablecloth. Who uses tablecloths anymore? So it’s either store it away, or turn it into something I can hang on my wall and enjoy every day.


I started by cutting it on the diagonal, so that I had four triangle pieces. I used those pieces as a template for size to cut the backing pieces. Since this is a sheer piece, I picked a fabric I could lay it on top of. I picked a color that closely matched the sheer linen of the tablecloth, a lovely yellow fabric from QTfabrics.com. I measured out the triangle pieces I would need and cut the background fabric to size.
Next, I printed the flying geese from EQ7. (I still haven’t upgraded to EQ8.) The flying geese measure 1″x2″ finished. I calculated how many flying geese I needed to fit along the sides of the triangles and went to work piecing. Though I love the look of flying geese, they sure are a pain to paper piece!
I picked a simple, square in a square block for the center, and decided to add a fancy button I had in my stash for a little bling. I’m getting a little ahead of myself though.

After piecing the rows of flying geese, I sewed them to the diagonal sides of the yellow, triangle background pieces. Then, I topstitched the table cloth on by using a green perle cotton thread through a couching foot. I used a matching green thread and a small zig zag stitch to affix the tablecloth to the top. It added a nice, textured touch, and really helped to frame the pieces so they popped out! Then, I added the borders.

The first bit of quilting I did was the ruler work technique. I’m the first to admit, on a domestic machine with a 7.5″ throat space, ruler work is not easy. But I love the look! It’s so precise. I wanted to fill the space with a crosshatch design and I’m so pleased with how it turned out!!

I had this beautiful butterfly fat quarter from Robert Kaufman in my stash and I wanted to use them. I ironed Steam-a-Seam onto the back of the fat quarter and tediously cut out several butterflies. I ironed them onto various parts of the tablecloth. I did quilt them by topstitching them down once I started quilting (more on that later), but I don’t think it was necessary to stitch on top of them since it is a wall hanging and will not be washed ever.


I’ll admit, I got the idea for the feather trail behing the butterflies on Pinterest. Not to brag, but it looks amazing!

For the rest of the triangle applique sections, I outlined each flower and leaf, while filling in the spaces with stipple and a few flowers. I quilted the flowers by free hand drawing the flower with a fabric marker first, then using that to quilt on.


I used a continuous line free form quilting on the flying geese. In the striped border, I first went along the green edges with a blanket stitch. Then, I made a cross pattern in the yellow space.
The result is an evenly quilted piece. I tend to add a lot more decorative quilting in a wall hanging rather than a large lap or bed quilt. First, it’s easier because it’s much smaller! But also, the more quilting, the stiffer the piece. So if you want to cuddle up with a soft quilt, limit the quilting.