I love a mini project, don’t you? They can be accomplished in a fraction of the time it takes to make a quilt, and you can use up scraps from said quilts.
I love snow. Probably because in central North Carolina we don’t get a lot. Even the tiniest dusting will cause everything to shut down and grocery stores to run low on milk and bread, just in case.
I created this little snowman mini pillow to commemorate my love of snowy winters. Mini pillows can be used on shelves, tier trays, and basket display decor.
See how I did it below, and make your own!
Getting Started
I grabbed some buscuit cutters and other round things, markers, little scissors, a Steam A Seam sheet, and fabric, lace, and felt scraps. Oh how I love to use up textile scraps!
I placed a piece of the Steam a Seam on the white fabric (a tablecloth scrap). With my biscuit cutters, a spool, and a marker, I drew some different sized circles for my snowman.

I pressed the snowman circles on the background fabric. Then, I looked on Pinterest for snowman scarf and hat shapes. I grabbed my scissors and fabrics, and eyeballed cutting the scarf and hat. (The scarf fabric has Steam a Seam on the back.)
I cut the background fabric 5.5″ x 7.5″ and the snowflake fabric 2.5″x7.5″. I auditioned the lace for a snow carpet a the bottom. I liked it. I sewed it on the background fabric with a 1/4″ seam. Then sewed the side pieces on.


Now, it was time to give this little man some personality. I got some black perle cotton thread, size 8, and started stitching. No real plan, y’all, I just winged it. I straight stitched around the felt hat to hold it down, and gave him a face and just kept going around his little body. I just happened to have a little baggie of carrot buttons and I used one for the nose!


I got some brown perle cotton and eyeballed some twiggy arms with a running stitch. With white perle cotton thread, I made up some snowflakes with straight stitches. Note: I do not use a hoop – I just hold the fabric in my hand and go. Be careful not to pull the threads too tight when you stitch or the fabric will bunch up.
Making the Pillow
Once you get the snowman and background just how you like it, it’ll be time to start making the pillow. Use the front, snowman panel as a template to cut the batting and backing pieces.
“It’s a pillow! Why am I using batting?” Well, I like to line the front panel with batting to give it a nice smooth look, and to prevent a lumpy look once stuffing is inserted. I do not use basting spray, the project is small enough for the batting to do it’s thing without it.
Layer in this order: batting to wrong side of front panel, then front panel and backing facing each other. See photo.➡️

Sew all the way around leaving a small turn hole. Use matching thread (sometimes threads can show through at the corners). Backstitch at corners and at the turn hole.
Trim the corners to prevent bulk.
Turn right side out. Press to flatten it all out and anchor the turn hole fabric inward.


Finishing Touches
I found a fluffy, snowy looking decorative yarn in my stash. This yarn is great for hiding the French seam stitching, which will close up this pillow.
“What’s a French seam?” A French seam will enclose the raw edge seam allowance on the inside so no raw edge is visible. Now, this pillow will be eternally closed up, so why would I bother with a French seam? In this project, I wanted to add a little border, without adding a border. The French seam gives that effect perfectly.

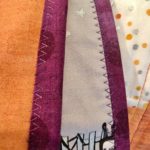
Here, I accomplished a French seam by sewing about 1/4″ in from the edge. I used a small zig zag stitch to go over the yarn as I stitched along.
The photo to the right shows the stitching on the back side of the pillow.

An idea for upcycling stuffing is to use filling from an unused pillow in the home.
I had something super cool! Untreated cotton directly from the field next to my parents’ house. After cotton is harvested, quite a bit is leftover in the field. I picked some out of the bolls and stuffed my mini pillow with it until I had the desired “stuffiness.”


To close up the turn hole, I used wonder clips to hold the opening and the yarn in place. Using a walking foot as before, I stitched a narrow zig zag stitch over the yarn. This will naturally close up the turn hole and voila! A pillow is born.

I’ve found the perfect little spot for my snowman pillow to ride out the winter. Here, in my little sewing storage area is my eye candy oasis.

Watch the YouTube Video
Would you rather hear me talk you through it and demonstrate the stitches? Click the video on the right to see it on my YouTube channel.