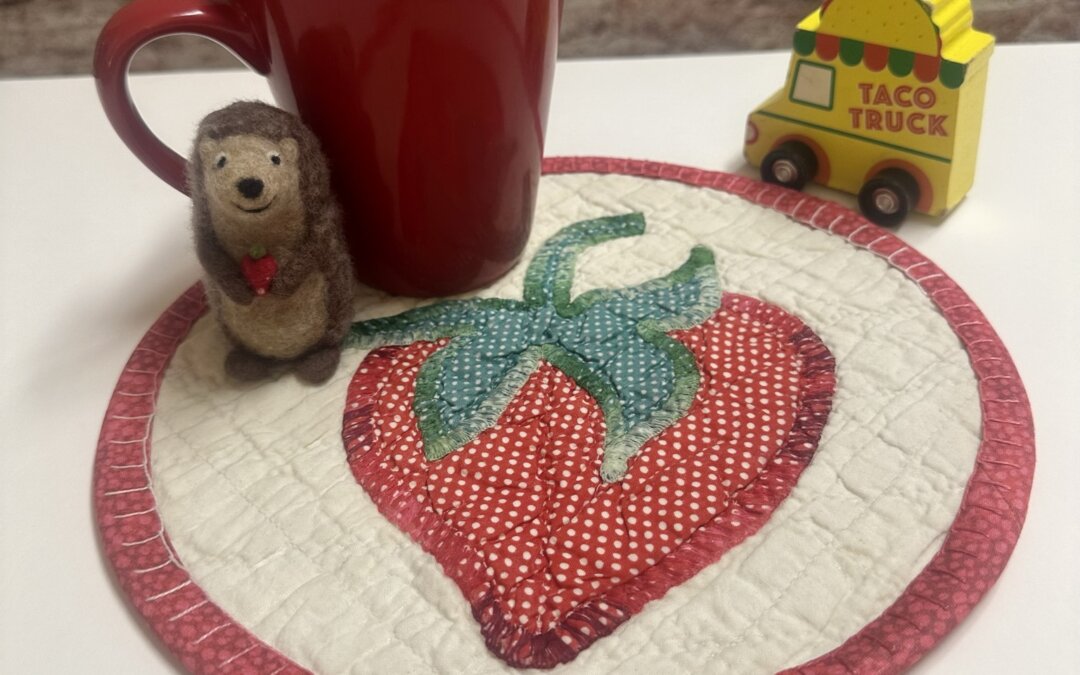
Mug rugs are a quick and easy project to make, especially from something already quilted – like this tattered and worn strawberry quilt I am repurposing one project at a time.
Though simple to make, I’ve added a few materials and techniques which may be new to you in this mug rug project. So follow along, I can’t wait for you to see this!
Materials List:
- a scrap of PUL fabric
- fabric marking pen
- fat quarter for bias binding
- a quilted scrap at least 12″ in diameter
- a container of HeatnBond liquid vinyl
- a paintbrush
- HeatnBond pressing paper
- parchement paper
- 6″ x 24″ ruler, cutting mat, iron, sewing machine, thread, the basics

Begin by using a circular object to cut your mug rug the size you want it to be. I used an embroidery hoop. Also, cut the PUL fabric the same size.
Layer the fabric side of the PUL to the back of your mug rug. The waxy side of the PUL should be what lays directly on the table top to prevent moisture from coming through the mug rug and ruining your tabletop.

To make the bias binding, use your 6″ x 24″ ruler to line up the 45 degree angle along the selvage. Using your rotary cutter, cut the diagonal line and make (2) 2.5″ strips, or more depending on how big your circle is.
Join and sew the binding strips end to end to have the length you need to go around the mug rug.
*VERY IMPORTANT STEP: Iron the strips in half.
If you do not iron the binding strip in half, you will end up with a twisted binding after sewing it on…like I did. 😭


This photo here is what I’m talking about. You will think everything is going spledidly, then, you’ll flip the binding over, and realize it’s all janky.
For whatever reason, ironing the binding – as opposed to finger pressing it and hoping for the best – does not work for bias binding. The fold does not stay unless it’s ironed.
Once you’ve ironed the binding, begin to sew it on the back of the mug rug using a quarter inch seam. If you prefer, clip it onto the mug rug before you sew, but do not pin it. Pinning it will create holes in the PUL that will not go away and will allow moisture to slip through, defeating the purpose of the product.


As shown in the photos above, sew the binding to the edge of the mug rug. Leave a small space at the start and finish to tuck in the raw edges and finish off the circle neatly.
To finish off the binding, tuck one raw edge into the folded end of the other end of the binding. Then sew it down.
Next, flip the binding around to the front and hold it down with clips while you hand stitch the binding with a favorite stitch.

Here, I have used a blanket stitch with no. 8 Perle cotton variegated thread.
*Be sure you do not take your needle all the way through to the PUL fabric. The holes will not go away and moisture will seep through.
Carefully sew the binding down by going no further down than through the batting. This will be sufficient to hold the binding down.

Liquid Vinyl
Now for the fun part of using liquid vinyl by HeatnBond. I always love trying out a new product, especially when it’s successfully implemented.
This part is completely optional. If you do not intend to use this project as a mug rug, but perhaps as table decor, it woudn’t be necessary.
However, if you plan to set coffee mugs, crackers, or anything else that could stain, liquid vinyl is a fabulous option.


Using a paint brush, apply a layer of liquid vinyl to the top of the mug rug. I included around the top of the binding and stitching.
Let it set at least an hour. Then, set the dried mug rug on top of a hard surface and parchment paper. Lie Pressing Paper waxy side down on top, and iron according to directions to set the vinyl.

All of these directions are on the packaging. You can repeat up to three layers of liquid vinyl, but I found one layer was enough.
It leaves a smooth, waxy texture – perfect for a mug rug or placemat.
Speaking of placemats…that’s next month’s upcycled old quilt project!
Have you ever tried PUL or liquid vinyl? Let me know in the comments.


0 Comments