
Are you like me? You’ve got a bleeding heart for those abandoned quilt blocks and tops found in antique stores. Who made them? Why weren’t they finished? I love doing my part for sustainable quilting and bringing these blocks and tops back to life!
I found these orphaned quilt blocks in an antique mall in Texas. It looks like they are likely made from old clothing judging from the fabric patterns. I snatched them up thinking it would be perfect to whip it up into a quilt for my son (he’s three).

Before I got to work, I soaked these blocks, and some others, in Retro Clean. This is a magic potion for getting stains out of textiles. I let the powder do it’s magic for a couple of days in the hot summer sun, and they came out brighter and cleaner than I even realized they could be. This stuff is a great investment, and a little bit goes a long way.

So below is the process of soaking I use. Mix up the powder and warm water in a cooler. It usually recommends soaking at least 24 hours, if not much longer. I like to use a cooler in the sunshine because it stays warm much longer than it would in a bathtub or sink.
Check it every few hours and give it a whirl with tongs or something. Be amazed and disgusted at how dirty the water is.


So here is my son helping squeeze the water out. Then we hung it all out to dry. The final step is rinsing it all once more to get the solution out of the textile.


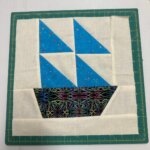
Just like quilt blocks we would make ourselves, we have to trim orphan blocks down to make them square. Here, I needed to make sure (as best I could) to leave 1/4″ on each side so as not to cut off the points of the sailboat. This wasn’t always possible. Honestly, in the scheme of the whole quilt, it won’t matter. This is not going to be a show quilt. What’s most important here is that they are all cut to the same size.
I’ve used my rotating mat to help out with this. A rotating mat keeps you from having to reposition the square as you are cutting each side. They are essential for squaring off blocks more easily and quickly.


The result are square blocks, albeit likely a little smaller. In this case, my blocks ended up being about one inch smaller. Some of the points ended up being cut a little closer than I’d like. You can see that in the far right picture above where the top sails are cut close. Remember, in the grand scheme of the quilt, this is not going to matter.

And then, voila, I had a quilt top. I totally meant to document how I put this together, but I got in a groove and copmletely forgot to document. So here’s what I did…
I cut strips from one inch wide at the bottom, to two inches at the top. I alternated sewing them around each side so they would look like they were rocking in the sea.
Placing each row in alternating directions I did to add interest and movement. I love how it turned out. My son even “helped” me baste it out on the back porch.🙂
As soon as I finished up the binding, my son, who was in the sewing room with me, insisted on laying on it. The ultimate smile of approval.


0 Comments