
It’s super simple!
Joining the Ends of Binding – The Cheater Way

I’m just gonna dive right in. Start with 2.5″ strips (not on the bias), and join them end to end. Then, fold in half wrong sides together and press with a hot iron.
Next, align the raw edges of the quilt back and binding strip. Begin stitching about three inches down. Stitch with a 3/8″ seam allowance and backstitch at the start.

Take the top raw edge of the strip and align it with the raw edge of the quilt, folding it creating a 90 degree angle. Finger press in place.
Stitch the binding all the way around the quilt. When you approach the beginning, folded section, stop stitching.


Trim the end of the binding strip so that it just fits inside the fold you created. Place the end inside the fold. Finish stitching until you overlap the beginning.


Fold binding over to the opposite side of the quilt and hold in place with Wonder Clips.
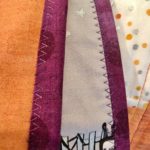
Topstitch around the folded edge of the binding all the way around the quilt. Topstitching over the ends of the binding that you have folded into one another will naturally hold the binding in place. There is no need to do any other stitching where the ends meet. This will never come out as you have locked it in place with the topstitching.
All done! See my next post for how I do mitered corners with binding. (It’s way easy!!)

I topstitched here with a decorative stitch and variegated thread.

Watch it on YouTube
Need to see it in real life? I’ve updated this post to now include the video I made of it.
Join
quilt With Me


0 Comments